A bootable USB drive is the most convenient way to carry a ready solution for diagnostics, repairs and installations of the Windows operating system. A drive is more durable than a physical disk, and usually faster as well. What’s even more important, however, is that you have the right tools to create bootable USB drives.
This article looks at three of the best USB creation tools available on the market today that can reliably burn ISO files to create bootable media on pen drives.
Navigation of Contents
Microsoft Windows USB/DVD Download Tool
This tool remains a user favorite when it comes to creating bootable flash drives from ISO files. Originally distributed by Microsoft, this utility was migrated to CodePlex but is now back on Microsoft’s servers at this location.
To download the utility, just go to the linked page and hit the Download button. In the next page, you’ll see various language options; select the .exe file for your language and click on Next to download the file. You’ll also be shown some installation instructions telling you that formatting the USB drive from within the tool can be bypassed, but that it has to be manually formatted before using the utility to create bootable media.
Once you’ve installed the application on your PC, download the ISO file. You can get it from Microsoft’s servers, but you’ll have to go through the Media Creation Tool page to download the disk image. To bypass the media tool, make sure you select the option to Install Windows on a Different PC, as well as the ISO File option when prompted.
When your ISO file and the tool are ready, you can create the Windows bootable USB by following the steps shown below:
- Step 1: Launch the Windows USB/DVD Download Tool and select the ISO file using the Browse button. Insert the USB drive (at least 8GB capacity) and click Next in the software interface.
- Step 2: In the next window, select theUSB device as your target device for the ISO file to be copied to.
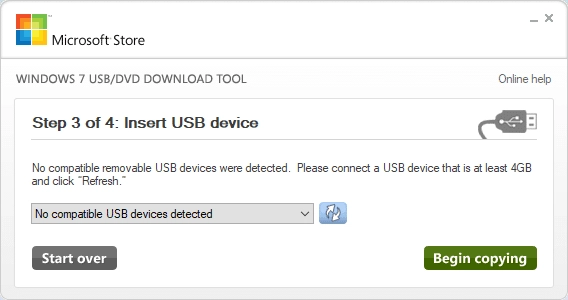
- Step 3: In the final window, make sure the correct USB is showing in the drop-down menu and hit Begin Copying.
Your Windows bootable USB will be created in a few minutes, and this can now be used for installations, repairs and diagnostics. Please note that this utility can only be used with Windows ISO files that have been downloaded from Microsoft’s website. Also, since it is a single-purpose tool, this is the only thing you can do with it. There aren’t any options to edit the ISO file or extract the contents, which might be necessary when manually formatting the USB drive to hold a Windows installation. For more flexibility and functionality, try the second utility described here.
UUByte ISO Editor
This all-in-one editor, disk authoring tool and ISO creator is a versatile utility for creating bootable media on a USB drive or a physical DVD. It will also allow you to edit the files inside the ISO, including removing and adding them. You can also create ISO files from files and folders on your system as well as create disk images from physical DVDs and CDs. Consider it the Swiss Army Knife of ISO files.
UUByte ISO Editor can be used to burn any bootable ISO file to a USB drive and make a boot source for a Windows installation, repair or diagnostics. It has been thoroughly tested on all the top storage device and PC brands, and is also available for the Mac platform. The interface is highly intuitive, and the developers have made sure that all the complex processes such as formatting the USB are done in the background, leaving the user free to focus on the task at hand.
How to Use UUByte ISO Editor to create a Windows bootable USB
- Step 1: The steps to get the ISO file are the same as described above. To get the editor, download the installation file from the official website and follow the instructions to set it up.
Step 2: Launch the program, click on the Burn module and import the Windows ISO file that you’re using to create the bootable media.
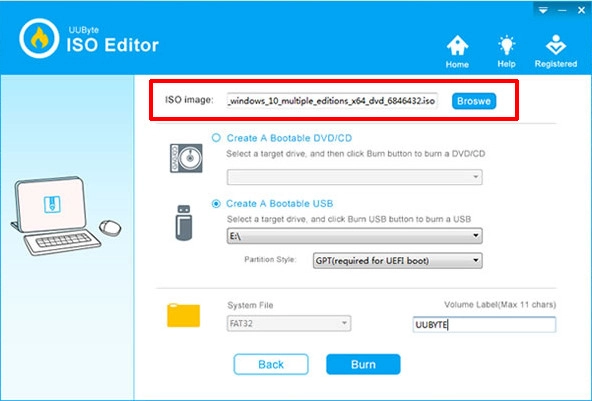
- Step 3: Insert a USB drive and make sure it has been detected, and that you have selected it from the drop-down menu. Click Burn to create your bootable USB.
As you can see, the process is very straightforward and requires no techical experience. The USB drive will be formatted to the right partition scheme and file system based on which version of Windows you’re working with, and all you need is one click to copy the bootable ISO file to the USB drive.
RMPrepUSB
RMPrepUSB is an advanced tool for formatting USB drives and installing OS bootloaders for various operating systems including Windows. It can also be used to create multiboot USBs, run a hard drive scan and even flash a new BIOS. For the purpose of this article, we’ll stick to the bootable USB creation function.
You may be a little overwhelmed by the RMPrepUSB interface, so be warned. However, even though it looks complicated, it’s not hard to figure out how to get your bootable ISO file on to a USB drive using this versatile utility since the steps are literally numbered within the software interface.
How to Use RMPrepUSB to create a Windows bootable USB
Here’s step by step guide to creating bootable USB,
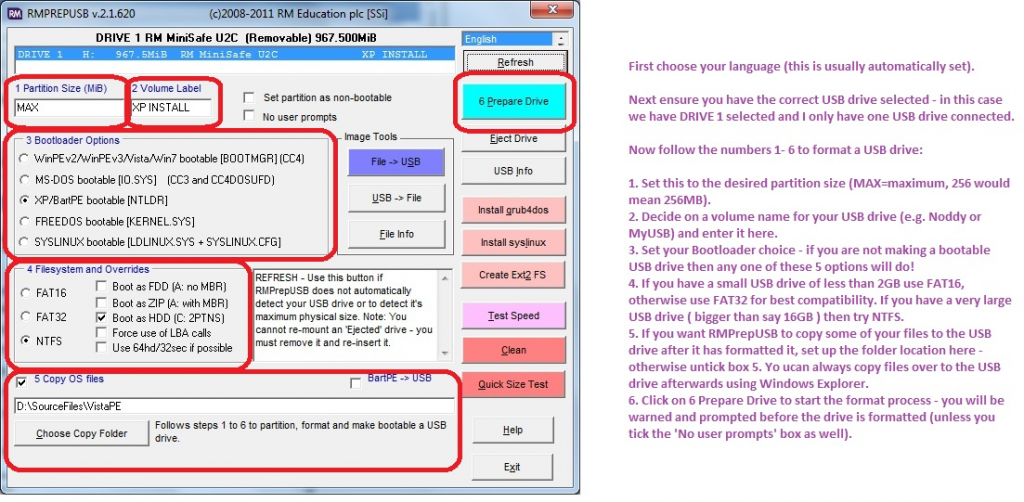
- Step 1: After downloading and installing RMPrepUSB on your Windows PC, insert the USB drive, launch the program and make sure that the drive is selected from the list at the top of the software interface.
- Step 2: Item 1 is your limit for the partition size created on the USB. Just leave this is MAX if you’re not sure what to set it at. Item 2 is the name of your USB, which you can change here.
- Step 3: Choose the appropriate bootloader option, which would be the third one. In the Image Tools option, select File → USB.
- Step 4: In File Systems and Overrides, select FAT32 for best compatibility. You can choose NTFS if you have a high-capacity USB drive over 16GB.
- Step 5: The newer versions of RMPrepUSB allow you to extract directly from ISO and copy the files to the target drive after formatting. Leave the Copy OS Files option checked, since this is what we want to do. You will need to specify the ISO file from which the content is to be extracted by choosing Yes when prompted, and then selecting the ISO file.
- Step 6: Finally, click on Prepare Drive to initiate the formatting. The files will be extracted and copied to the USB drive after it is formatted.
This method is not all that hard to use, but if it’s confusing then we recommend the second method. The software is user-friendly and doesn’t require any technical expertise. If you’re a newbie to creating bootable USB drives, this is the option for you.